 Get my Cookbooks!
 Buttermilk Biscuits

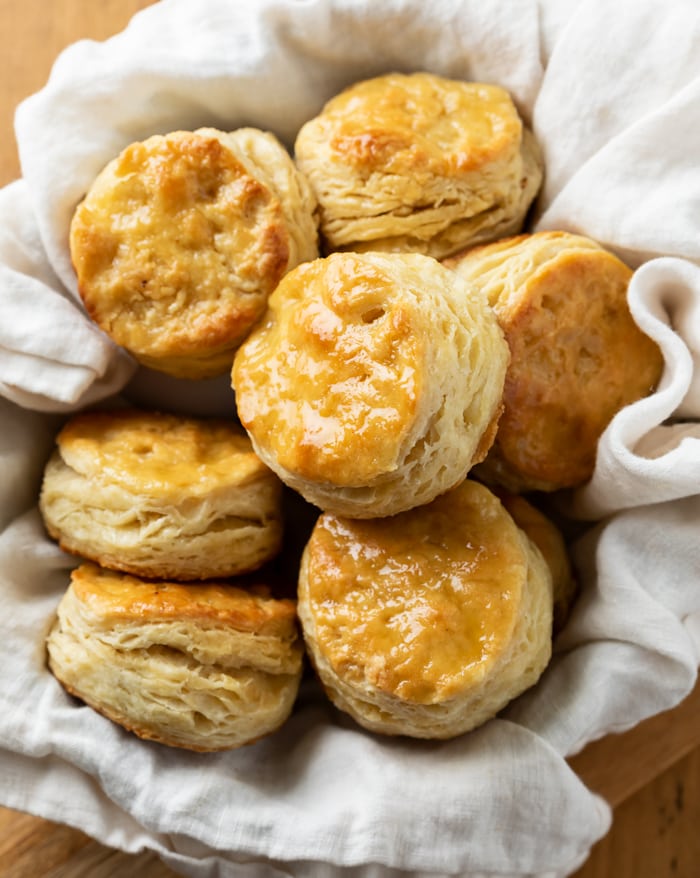
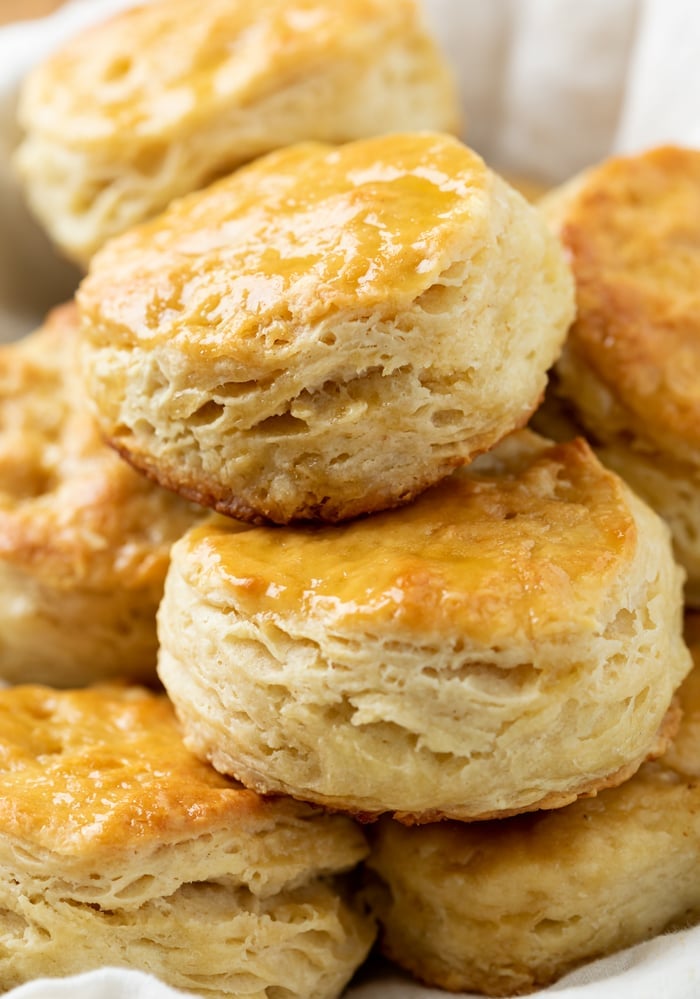
These homemade buttermilk biscuits have fluffy, flaky layers and a sweet honey butter topping. They take just 35 minutes to make with just 6 ingredients!
Be sure to serve these with my savory Sausage Gravy or my Chicken Pot Pie with Biscuits.
Buttermilk Biscuits
I am not typically a successful baker, and I have yet to mess these biscuits up. It hasn’t ever happened once. So I promise you, you can do the same.
Be sure to check out my PRO TIPS and it will be a breeze, there are just a few simple rules to follow. (BONUS: You can even make these without buttermilk, check out my substitution options below!)
How to Make It
See recipe card below this post for ingredient quantities and full instructions.
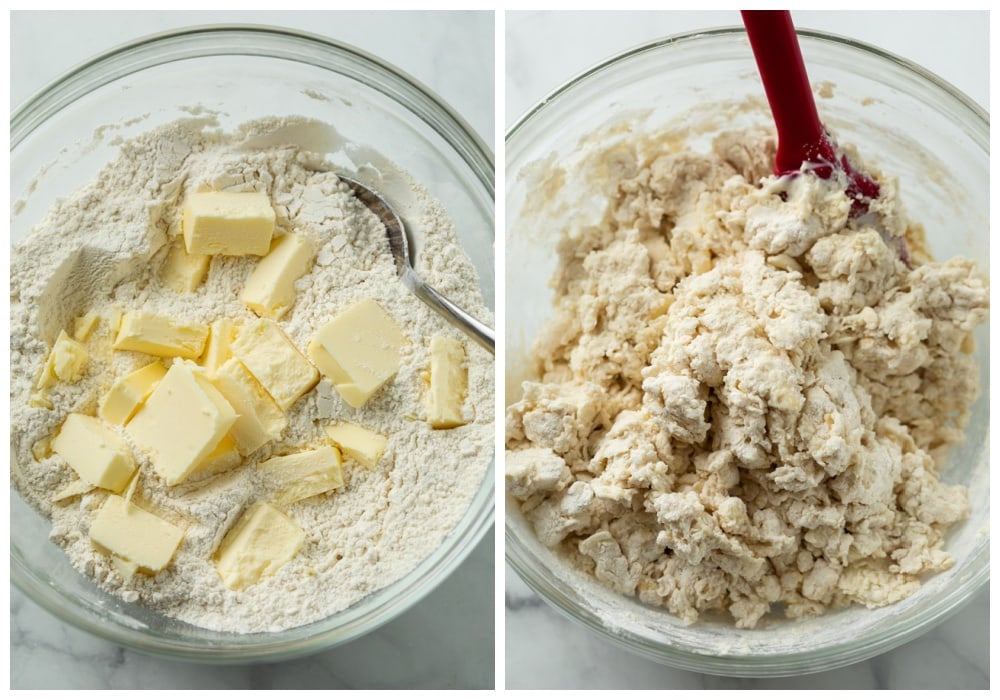
Combine flour, baking powder, and salt. Cut the cold butter into cubes and add it to the bowl. Use a pastry cutter to work the butter in until coarse crumbs have formed.
Create a hole in the middle and add cold buttermilk and honey. Use a silicone spatula to stir until just combined, don’t overmix.
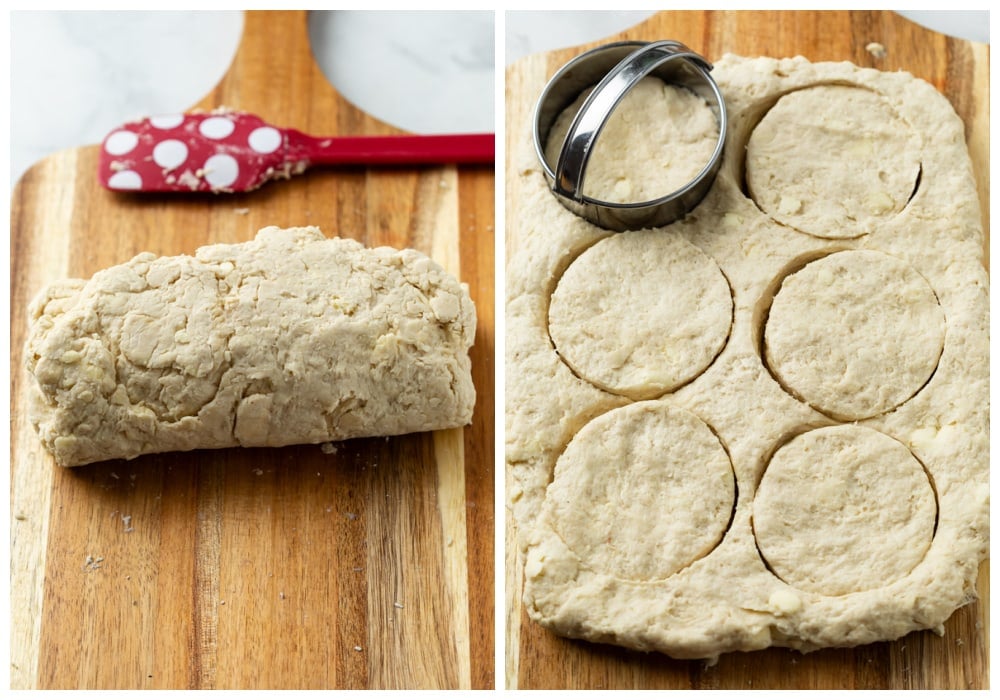
Use your hands to gently form a 10-inch rectangle. Fold one side into the center, then the other side. Rotate the dough horizontally and gently form it back into a 10-inch rectangle.
REPEAT the same folding technique 2 more times. This is what creates the layers in the biscuits.
Form into a 10 x 7 inch rectangle about 1-inch thick. Use a 3-inch biscuit cutter (product link in tools section below) to cut out 6 biscuits. Roll back into a rectangle that’s 1-inch thick and cut out 2 more biscuits. You’ll end up with about 8 in total.
Want to save this recipe?

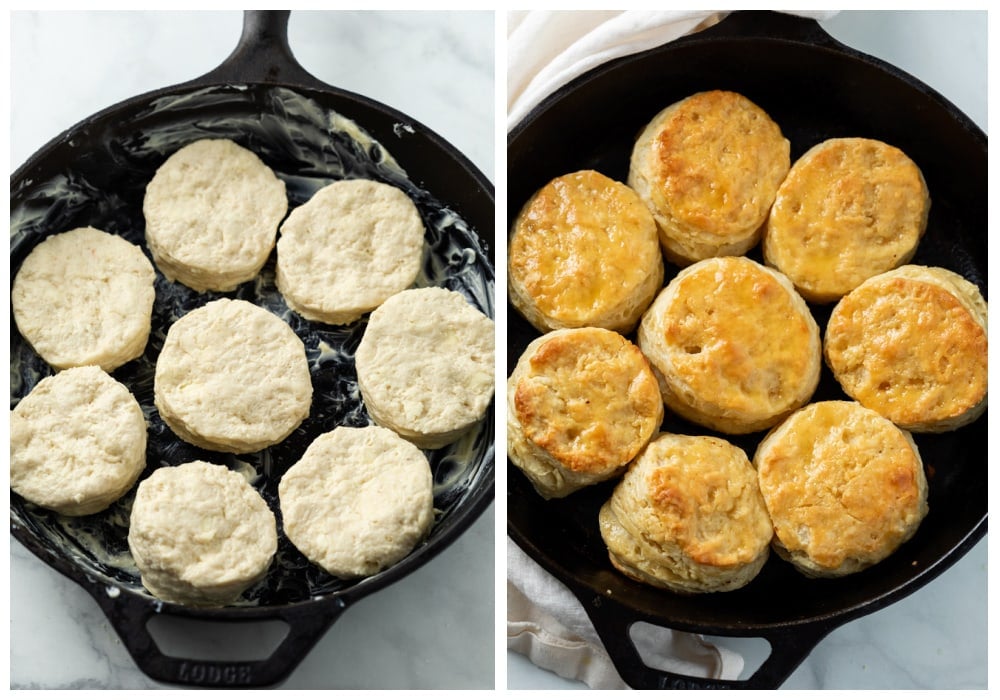
Place into a buttered cast iron skillet or on parchment paper.
Place them close together- this is important as this helps them to rise. Bake at 425° for 15 minutes or until the tops are golden brown.
Combine honey/melted butter and brush the tops when they come out of the oven. For more browning on top, bake for up to 5 more minutes at 450°. Serve and enjoy!
Pro Tips
- To properly measure the flour, take a spoon and scoop it into the measuring cup as opposed to dipping the measuring cup into the flour. Use the knife to level off the top. This is important to have an accurate measurement.
- Alternatively, you can weigh the flour. 2 ½ cups all-purpose flour is equal to 300 grams. Be sure to subtract the measuring cup from the weight.
- Don’t twist the biscuit cutter: it will seal the edges and prevent airflow which will hinder them from rising.
- Salt: Non-iodized salt is best for baking. (Table salt is generally supplemented with iodine, which can generate a bitter taste in baked goods.) I use Redmond Real Salt for all of my baking and cooking recipes. (Enter code ‘COZY‘ for 15% off!)
- Butter: I use salted butter for this recipe but feel free to use unsalted. Land O’ Lakes or Cabot Butter are my preferred brands. If you have frozen butter, you can shred it and incorporate it into the dough instead of refrigerated butter.
- If you don’t have honey, an equal amount of sugar can be used in the biscuits and you can brush the tops with just butter. (But honey really adds *great* flavor!)
- Make sure the butter is very cold. When the butter melts in the oven, it creates steam which forms air pockets, which makes the layers light and fluffy.
- Don’t overmix the dough or it will become too dense and won’t be as flaky and soft.
- Fold the dough as instructed and pictured above- this is really important, that’s what creates the layers within the biscuit.
- A large fork can be used if you don’t have a pastry cutter.
What Does Buttermilk Do For Biscuits?
- Tang: Buttermilk adds a nice tangy component to baked goods.
- Acidity: The acidity in the buttermilk works in conjunction with the baking powder to help the biscuits rise.
- Liquid: This is what forms the dough and creates steam in the oven which in turn, allows the layers in the biscuits to rise.
- Low Fat Content: Buttermilk is usually low in fat content, which works as a nice offset since butter is dispersed throughout the dough and is high in fat.
Buttermilk Substitutes
To create a substitute for buttermilk, you’ll need milk and any one of the following: Sour Cream, Plain Yogurt, White Vinegar, or Lemon Juice. These instructions give you enough to make one cup, which is sufficient for this recipe.
- 4 tablespoons milk + 3/4 cup sour cream.
- 2 tablespoons milk + enough plain yogurt to make a cup.
- 1 tablespoon white vinegar + enough milk to make a cup. Let sit for 5-10 minutes.
- 1 tablespoon lemon juice + enough milk to make a cup. Let sit for 10 minutes. It’ll look curdled. Stir to combine.
Make-Ahead Method
- Method #1: Prepare the dough and cut the biscuits. Refrigerate for up to 2 days prior to baking. Alternatively, you can prepare the dough and complete the folding steps, cover the dough with plastic wrap and cut the biscuits prior to baking.
- Method #2: Make dough and cut biscuits as outlined. Flash freeze on a baking sheet for 2 hours, then store in a freezer bag for up to 3 months.
- Let them defrost in the fridge overnight, then bake as outlined.
Storage
- Store in an airtight container and refrigerate for up to 5 days.
- Refrigerated biscuits retain more moisture and therefore taste better when reheated (vs. storing at room temperature).
Tools for This Recipe
(Amazon affiliate links)- Check out all of my kitchen essentials here.
Try These Next
-

- Chicken Pot Pie with Biscuits
-

- Au Gratin Potatoes
-

- Chicken Enchiladas
-

- Stromboli
-

- BEST Pizza Dough
-

- No Knead Bread
Get My Free E-Book!
- I’ve got a FREE e-Book with 7 super popular dinner recipes! Click here to join my email list and I’ll send your e-Book right over!
- And be sure to follow me on Instagram, Pinterest, & Facebook!
Tried This Recipe?
Leave a review, I love hearing your feedback! ⭐⭐⭐⭐⭐

Buttermilk Biscuits
Ingredients
- 2 ½ cups all-purpose flour
- 2 tablespoons aluminum free baking powder, *not baking soda*
- 1 teaspoon salt
- 2 teaspoons honey
- 1/2 cup very cold butter, equal to 1 stick.
- 1 cup + 3 Tablespoons cold Buttermilk
Topping
- 2 Tablespoons honey
- 1 Tablespoon butter
Instructions
- Preheat oven to 425°.
- Add the flour, baking powder, and salt to a large mixing bowl. Stir until well-combined.
- Cut the cold butter into cubes and add it to the bowl. Use a pastry cutter (or the back of a fork) to work it in until coarse crumbs form.
- Create a hole in the middle of the dry mixture and add the cold buttermilk and honey. Use a silicone spatula to gently stir until just combined. Don’t overmix. It will be crumbly.
- Add the dough to a floured surface and create a rectangle with your hands about 9 inches long.
- Fold the left side into the middle, then the right side. (See process shots.)
- Rotate the dough so that it’s horizontal. Gently flatten into a rectangle again, and repeat the same folding process 2 more times.
- Form into a 10 x 7 inch rectangle about 1-inch thick.
- Use a 3-inch cookie cutter to cut 6 circles. Do not twist the cutter, it will seal the edges and prevent airflow which will hinder them from rising. Lightly flour the inside of the cutter in between. I like to store them in the fridge as I cut them to prevent them from getting too warm.
- Roll the dough back out until it’s 1 inch thick again and cut 2 more biscuits. You should end up with about 8 biscuits total.
- Butter a 10-inch cast iron skillet and place the biscuits inside so that they are almost touching. The close proximity makes them rise better. You could also place them close together on parchment paper on top of a baking sheet.
- Bake for 15 minutes or until the tops are golden brown.
- Combine the honey and melted butter and brush the warm biscuits with it. For more browning on top, bake for up to 5 more minutes at 450°.
- Store in an airtight container or in the refrigerator for up to 5 days. You can also freeze leftover biscuits.
Notes
To properly measure the flour, take a spoon and scoop it into the measuring cup as opposed to dipping the measuring cup into the flour. Use the knife to level off the top. This is important to have an accurate measurement. Alternatively, you can weigh the flour. 2 ½ cups all-purpose flour is equal to 300 grams. Be sure to subtract the measuring cup from the weight.
Salt: Non-iodized salt is best for baking. (Table salt is generally supplemented with iodine, which can generate a bitter taste in baked goods.) I use Redmond Real Salt for all of my baking and cooking recipes. (Enter code 'COZY' for 15% off!)
Butter: I use salted butter for this recipe but feel free to use unsalted. Land O' Lakes or Cabot Butter are my preferred brands. If you have frozen butter, you can shred it and incorporate it into the dough instead of refrigerated butter.
If you don’t have honey, an equal amount of sugar can be used in the biscuits and you can brush the tops with just butter. (But honey really adds *great* flavor!)
Don’t overmix the dough or it will become too dense and won’t be as flakey and soft.
Buttermilk Substitutes (Yields 1 cup):
- 4 tablespoons milk + 3/4 cup sour cream.
- 2 tablespoons milk + enough plain yogurt to make a cup.
- 1 tablespoon white vinegar + enough milk to make a cup. Let sit for 5-10 minutes.
- 1 tablespoon lemon juice + enough milk to make a cup. Let sit for 10 minutes. It'll look curdled. Stir to combine.
Make-Ahead Method
- Method #1: Prepare the dough and cut the biscuits. Refrigerate for up to 2 days prior to baking. Alternatively, you can prepare the dough and complete the folding steps, cover the dough with plastic wrap and cut the biscuits prior to baking.
- Method #2: Make dough and cut biscuits as outlined. Flash freeze on a baking sheet for 2 hours, then store in a freezer bag for up to 3 months.
- Let them defrost in the fridge overnight, then bake as outlined.
- Store in an airtight container and refrigerate for up to 5 days.
- Refrigerated biscuits retain more moisture and therefore taste better when reheated (vs. storing at room temperature).
Nutrition
Recipe Adapted from Sally’s Baking Addiction


These were delicious and paired well with grits and ham. I cannot wait to make again to perfect the dough layers. For my first time I give them a 10/10.
I am so happy to hear that AJ, I love that you served the biscuits with grits and ham, it’s a match made in heaven!! 🙂
So good! Saving this as my go to recipe. Made as directed only I cut my biscuits in squares instead of circles.
I’m so glad that you loved the biscuits Tennille! I love that you cut them into squares! I’ll have to do that sometime 🙂 Thank you so much for taking the time to leave a review!
Can’t wait to try them your recipes seem so easy
Thank you Kathleen!! I can’t wait for you to try them either! 🙂
These biscuits came out soooo good! It was my first time making biscuits from scratch and this recipe was so quick and easy to follow. Will definitely be making these very often!
I’m so happy you enjoyed the Biscuits Nikki! These haven’t failed me yet! Thanks so much for taking the time to leave a review💖
Made these biscuits for my family this morning. They came our perfect and absolutely delicious. Great recipe!
I am so happy to hear that Danny, thank you so much for taking the time to let me know how they came out!! I really appreciate it! -Stephanie
Love 8the gravy and biscuits yummy will make again
I’m so happy that it was a hit Kim! 🙂
I have never been good at making biscuits! But these biscuits were awesome! Came out perfect! I think my problem in the past was over working the dough. I watched the video and followed the instructions exactly. We love biscuits and sausage gravy around here and have always bought frozen biscuits….but no more! I’ll be making this recipe from now on! Note: I did not know there was aluminum free baking powder! I’ve never liked biscuits as well as most people because like you said there is an after taste I didn’t like….now I know why! Thanks for a great recipe!
I’m so happy these came out perfect Mari! I’m by no means a baker but these have never failed me. Thanks so much for taking the time to leave a review!💗
Absolutely delicious and relatively easy
I’m so happy that you loved the biscuits Cynthia!! I am a huge fan of these, my daughter likes to help me too! 🙂 Thank you so much for taking the time to leave a review, I really appreciate it! -Stephanie
These biscuits are absolutely delicious!!! My family can’t get enough of them. Definitely a new favorite in our home!
I’m so happy these have been a hit Michelle! It’s my go to biscuit. Thanks so much for the great review!❤️
These were amazing! I always grate in cold butter for biscuits and pastry dough, which worked well here. The folding technique helped make extra flaky, very well risen biscuits. I also popped them in the freezer on a pie plate after cutting them for 10-15 minutes before baking, which was a tip for a scone recipe that I’ve found helps ensure the best texture. I had never done biscuits in cast iron, and I’ll never go back now – the buttered cast iron made for a beautifully crisp buttery golden brown bottom on the biscuits.
That’s so cool you knew about the cold butter trick! I discovered that when making this recipe. I’m so happy you enjoyed these Cynthia, thanks so much for the great review!💗
These look so easy and good! They don’t need to rise before being baked?
No rising required! 🙂